

Google Docs is a free word processing software that is available both as a web app that runs on web browsers and as a mobile app for mobile devices.
If you use Google Docs for your document editing needs or maybe you’re new to the platform in general, you might be wondering how page numbers can be added to a document – more specifically, how to add page numbers on the top right corner of your document on Google Docs.
Adding the page number (automatically) to the top right corner of your document on Google Docs is a quick and easy process and in this article, we will show you just how to put a page number on the top right corner in Google Docs easily.
How To Put Page Numbers On The Top Right Corner On Google Docs
To put page numbers on the top right corner of all pages on your document on Google Docs, you have to first make sure all existing headers and footers are removed.
If you have tried adding page numbers to your document before, you probably have some headers (or footers) added so you will need to remove them first.
Below is a detailed step-by-step guide (with screenshots) showing how you can put page numbers on the top right corner of all pages of your document on Google Docs.
Before attempting to add page headers to the top right corner of your document on Google Docs, you first have to remove all existing headers (and footers) on each page.
If you have a really large document then don’t worry since you won’t have to do this manually for all pages. Removing a header (or footer) from any page on your document will automatically remove them from all pages on the document.
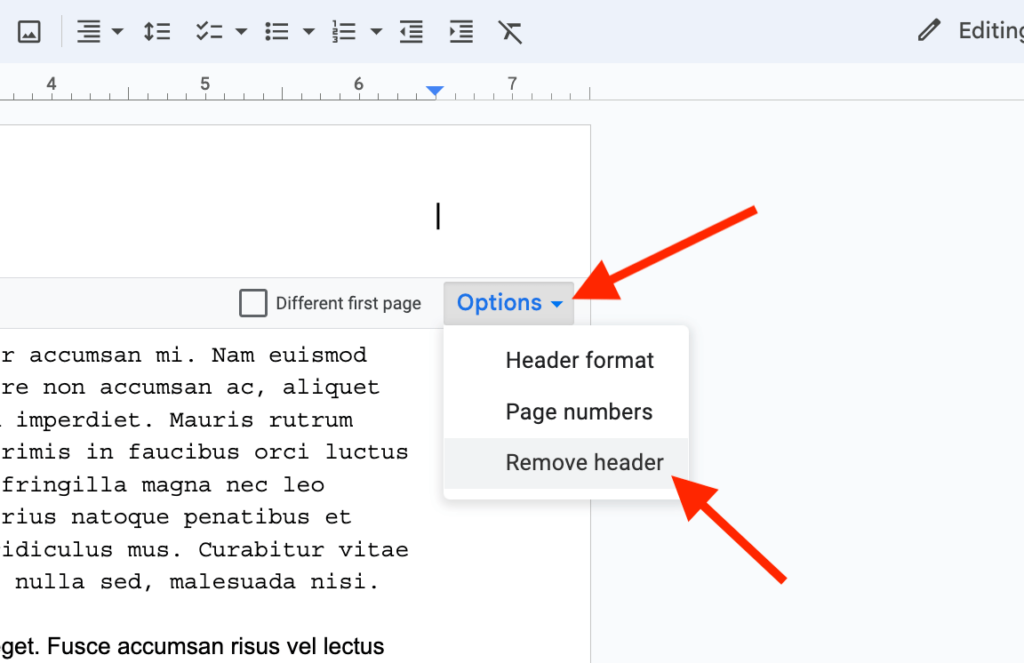
To remove existing headers (or footers), double click anywhere on the top (or bottom for footers) of a page then select “Options” > “Remove header” to remove existing headers on your document (or “Remove footer” for footer).
Step 2: Go back to the first page of your document and place your cursor there.
After you have removed all existing headers, footers, or both on your document, go back to the first page of the document (if you’re not there already) then place your cursor on any part of the page to make sure it is the selected page on your document.
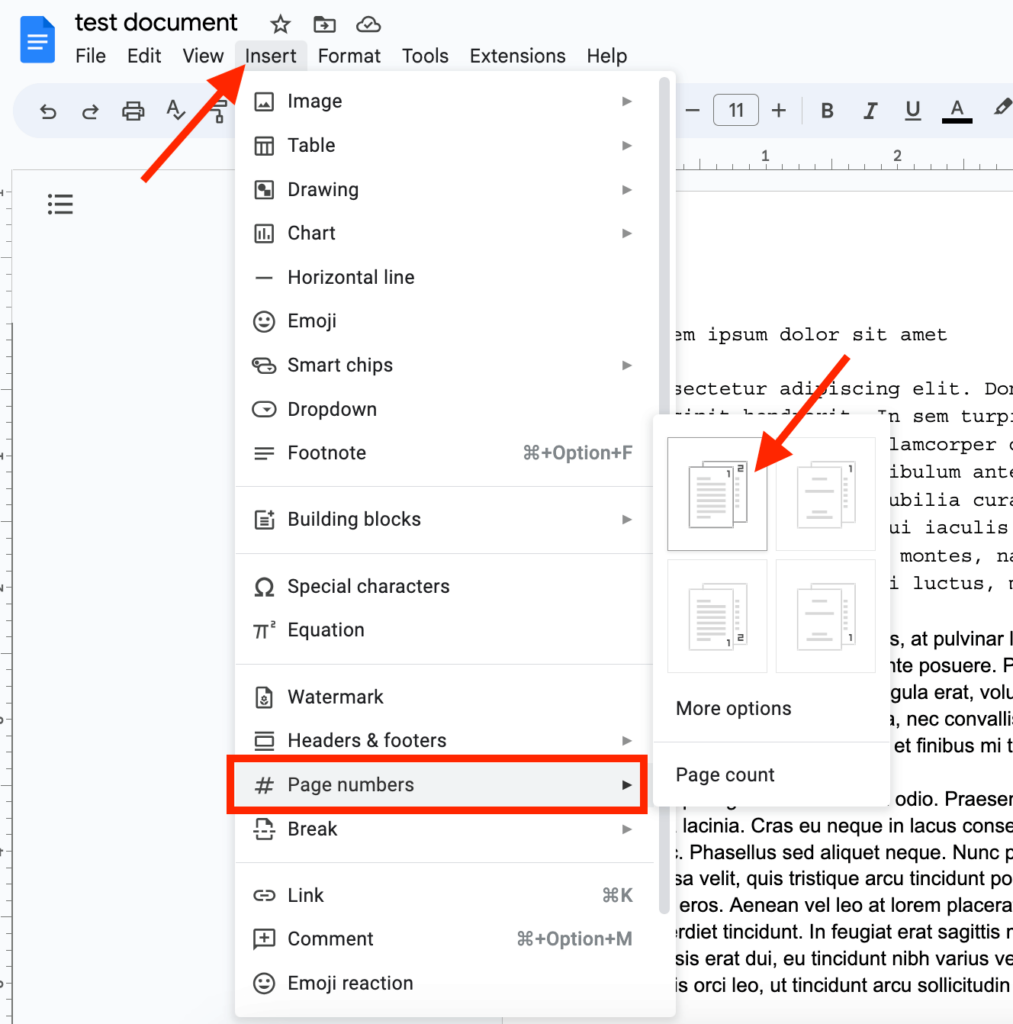
Now, go to the Google Docs menu bar and select “Insert” > “Page numbers” then choose the first option in the page numbers sub-menu.
After this, go back to your document and all the pages should now have their respective page numbers correctly labeled on the top right corner of each page.
And that’s how to put the page number on the top right corner of your document on Google Docs.
How To Add Page Numbers On The Top Left Corner In Google Docs
If you want to add your page numbers to the top left corner of each page instead of the top right corner of each page which is the default alignment, you can change it in a few easy steps.
To add page numbers to the top left corner of each page of your document on Google Docs, follow the steps below.
Step 1: Add page numbers on all pages of your document.
First, you will have to add the page numbers to each page of your document.
To this go to the Google Docs menu bar and select “Insert” > “Page numbers” then choose the first option in the “Page numbers” sub-menu.
Step 2: Select the page number and set the alignment to the left side on the top of your document.
After adding page numbers to your document on Google Docs, you will notice that the page numbers on each page are automatically placed at the top right corner of the page.
To move the page numbers to the top left corner of each page on your document on Google Docs, you simply need to change the alignment of the page number from right to left.
Just like every other text or number in any section of your document, changing the alignment of page numbers in the header of each document is quite easy.
All you have to do is highlight the page number on any page on your document (we recommend using the first page) then go to the Docs Toolbar and click on the Align icon then select the Left align icon to set the alignment to the left.
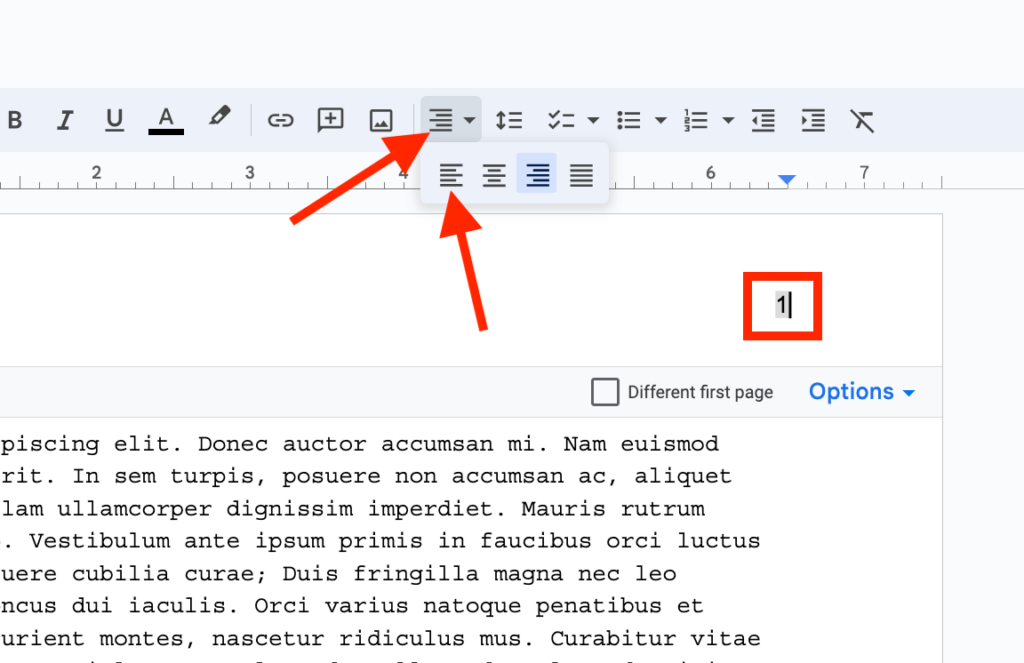
And that’s it. Now all the page numbers on each page of your document will be moved to the top-left corner of the page automatically.
To put page numbers on the top center of each page, the process is quite similar. Set the page numbers first, go back to the first page of your document, and select the page number there then set the alignment to the right from the Google Docs toolbar.
Wrapping Up
Google Docs is the top choice for many when it comes to document editing mostly because it is completely free software with a ton of features that anyone with a (free) Google account can access from any internet-enabled device.
Like other word processing software, Google Docs allows users to automatically add page numbers to all pages on any document when the feature is enabled.
Depending on your preferences, you might want to add page numbers to different sections of pages on your document.
And that will be all for this article. If you were searching for a way to put page numbers on the top left, top center, or top right corner of your document, we hope this article helped you achieve that easily.
