
Word Art is a powerful tool that allows you to apply various text effects, fonts, shapes, and styles to your texts thereby making them stand out and grab attention in your documents.
If you’re a Google Docs user, you might be wondering if it is possible to add Word art to your documents on the platform, and you’re not alone.
Like other word processing software out there, Google Docs does ship with an in-built Word Art tool that allows users to create stunning text designs and insert these designs into their documents.
If you’re looking to insert Word Art into your document on Google Docs, then you’re on the right page. In this article, you will learn how to add Word Art in Google Docs easily in a few steps.
Quick Answer:
To insert word art into your document in Google Docs, follow these steps.
- Open the Google Document.
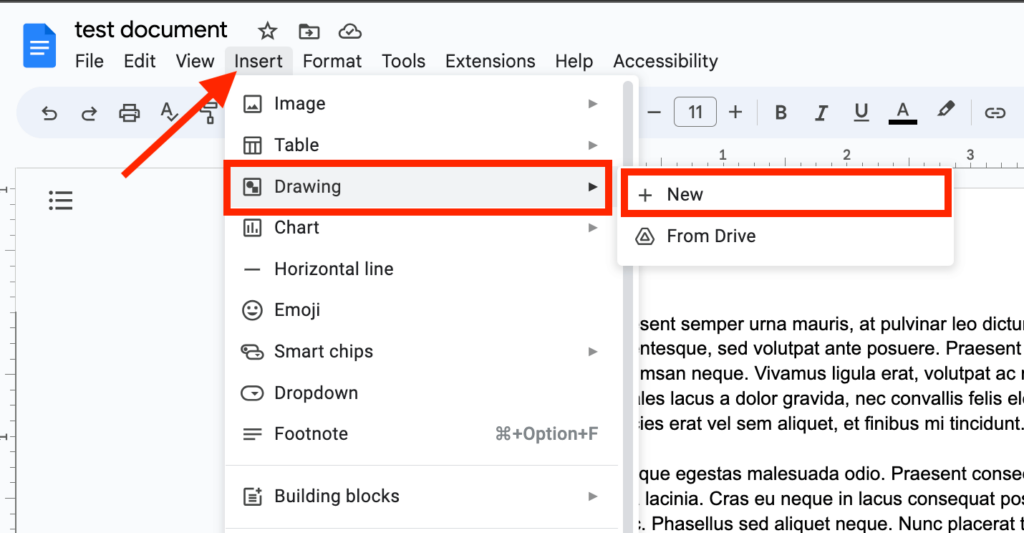
- Select “Insert” > “Drawing” > “New” on the menu bar.
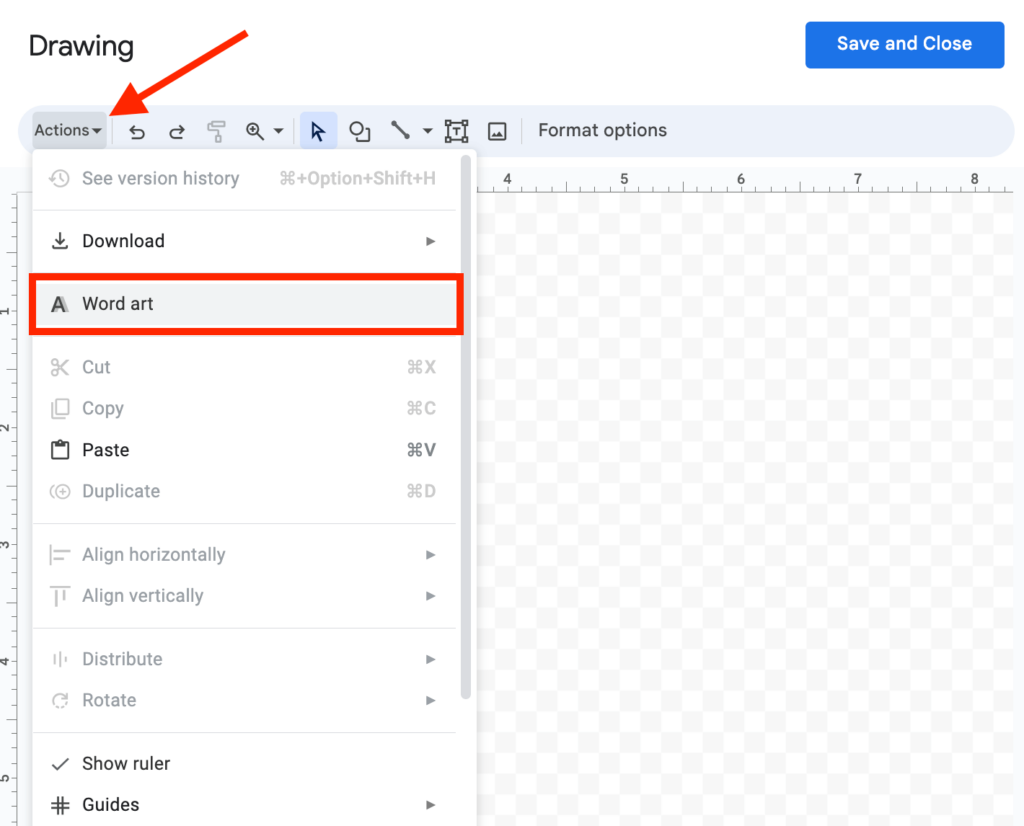
- Click “Actions” > “Word art” on the drawing tool.
- Customize the word art.
- Click “Save and close” to insert the word art into your document.
- Adjust the text wrapping options and size of the word art.
How To Add Word Art In Google Docs (2 Methods)
There are 2 methods of adding word art in Google Docs. The first method is by using the built-in “Word Art” feature in the Google Docs Drawing tool.
If you’re not satisfied with the built-in Word Art tool on Google Docs, you can simply create a Word art using an external website, customize the Word art, export it as an image, and then import it into your document on Google Docs.
Using any of these methods will add word art to your document and below we will explore both methods in detail with screenshots for easy understanding.
Method 1: Adding Word Art by using the drawing tool.
The Google Docs drawing tool is one of the most important features of Google Docs, especially for users who are looking to add unique designs to their documents on the platform.
On the drawing tool, you can create various shapes, lines, curves, and text designs and then insert these designs into your Google Doc document.
One thing many Google Docs users don’t know is that you can create and customize a word art directly on the Docs drawing tool and then insert the word art into your document from there.
Here is how to add Word art to Google Docs using the drawing tool.
First, jump the Google Docs menu bar then select “Insert” > “Drawing” > “New” to open up the Google Docs drawing tool dialog.
Step 2: Insert the word art into the canvas.
On the Google Docs drawing tool, click “Actions” on the left side of the toolbar then select “Word art”.
After that, you should see a text box. Enter the words you want to turn into a word art then hit Enter or the return key on your keyboard to add the word art to the canvas on the Drawing tool.

If you want to create a word art with multiple lines, hit shift + Enter (or return) on your keyboard after each line to create another line then hit only Enter or return when you’re done to insert the word art into the canvas.
Step 3: Customize the word art.
After inserting the word art into the canvas, you can now go ahead and customize the word art depending on what you want to create before inserting it into your document on Google Docs.
There are a handful of customizations for word art available on the Google Docs drawing tool. These include fill color, border color, border weight, border dash, and other text formatting options like bold, italics, and font options.
To change the fill color of the word art, go to the canvas and ensure that the word art is selected then go to the toolbar, click the “Fill color” icon, and select a fill color of your choice from the color palette.
You can also use gradient colors by switching to the “Gradient” tab in the color chooser dropdown.

For the border color of the text in the word art, the process is quite similar. Simply select the word art on the canvas then go to the toolbar, click the “Border color” icon, and select a color of your choice.

Border weight represents the thickness of the border of each letter in the word art while the border dash represents the design of the border around each letter in the word art. You can use the border dash option if you’re looking to create a word art with dotted lines in Google Docs.
To customize both the border weight and border dash of the word art, go to the toolbar and click the “Border weight” icon then select any of the available options to change the border weight of all letters in the word art and click the “Border dash” icon and select any of the available options in the dropdown to customize the border dash design of all letters in the word art.

If you want to change the font of the word art, select the word art, go to the toolbar, click the Font selector, and choose any font of your choice from the available options.

Likewise, if you want to bold or italicize the word art, go to the toolbar, select the “Bold” or “Italic” icon to bold and italicize respectively.

You can also use a key combination of Ctrl + B (or command + B) on your keyboard to bold and Ctrl + I (or command + I) to italicize.
Step 4: Insert the word art into your document.
When you’re done with customizing the word art, go to the top right corner of the drawing tool dialog and click “Save and close” to save the word art, close the dialog and insert it into your document in Google Docs.

Step 5: Adjust the text wrapping options for the word art.
To ensure that the word art fit in well with other texts and elements on your document, you will have to adjust the text wrapping.
Doing this is easy, just click on the word art where it was inserted in your document then select the “In front of text” icon from the text wrapping options.

Step 6: Adjust the size and location of the word art.
After changing the text wrapping of the word art, you can select and move the word art to any location on your document by using your mouse to drag it around.
You can also change the height and width of the word art by using the tiny square around the element when selected.

And that’s how you can insert a word art into Google Docs by using the drawing tool.
Method 2: Generate word art online and import it into Google Docs.
Another way to add word art to your document on Google Docs is by utilizing an external design platform where you can create the word art, then export the word art as an image and import the exported image into Google Docs.
There are a handful of external design platforms you can use to create word art online, but for this tutorial, we will be using a website called InkPX. Any other website or software that can be used to create (and download) word art should also do the job.
Here is how to add word art to Google Docs using InkPX.
Step 1: Visit the InkPX website.
First, create a new tab on your web browser then open the InkPX word art generator page by clicking on this link – https://inkpx.com/word-art-generator.
Step 2: Select a design.
On the InkPX word art generator page, you should see a couple of text design presets. Select any design style of your choice.
You can use the options in the side panel to group the presets based on design type to assist you in making a good choice depending on the design style you intend to achieve.
For this tutorial, we want to create a word art similar to the original Twitter text logo and import it into Google Docs, so we’re selecting the “Twitter” option.

Step 3: Create and customize the word art.
After selecting your desired design preset, you should be redirected to another page where you can create and customize the word art.
Enter the words you want to turn into a word art in the “Text” input box and adjust other customization options including the font, font size, line height, letter spacing, and others to your desired values.

You can switch to the “Style” tab to customize the design style and the “Background” tab if you want to add and customize the background color of the word art.
Unfortunately, there is no way to change the text fill color and border color of word arts on this platform so you will be stuck with the original colors from the selected design preset.
Step 4: Download the image.
Next, click “Download” then select the file format to be used for the download and click “Download” on the dialog to download the word art as an image using your selected file format.

Step 5: Upload the word art to Google Docs.
After the download must have been completed, go back to the Google Docs tab then click “Insert” > “Image” > “Upload from computer” then select the image using the file manager on your device.

Step 6: Adjust text wrapping options.
Finally, click on the image then select the “In front of text” option from the available text wrapping options.

After changing the text wrapping setting, you can adjust the height and width of the word art using any of the tiny squares around the image when selected.
Here is what the final product looks like.

Can I Curve Word Art In Google Docs?
If you’re a Google Docs user who is coming from other word processing platforms like Microsoft Word and LibreOffice Writer, you may be wondering if it is possible to curve word art in Google Docs.
Unfortunately, there is no way to curve word art directly on Google Docs and this is because customization options for word art in Google Docs are quite limited.
If you want to curve a word art in Google Docs, you will have to do it manually on the drawing tool by first inserting a curved shape (preferably a circle) then creating multiple word art text for each word and rotating each one to match the curve of the shape you inserted.
For a detailed guide on how to do this, visit our article on curving texts in Google Docs.
Can Google Docs Word Art Be Downloaded?
Yes, you can download Word art in Google Docs as an image file directly from the drawing tool.
To download a word art on Google Docs (if you have already inserted it into your document), select the word art then click “Edit” – this should open up the Google Docs Drawing tool.
On the drawing tool, click “Actions” then select “Download” > “PNG image (.PNG)” to download the word art as a PNG file.

Once the download completes, go to your Downloads folder and double-click on the downloaded file to view the word art in any image viewer software on your device.
Wrapping Up
Word arts are a way to make specific texts on your document stand out and improve the overall style and visual appeal of the document.
Like other Word processing platforms out there, Google Docs also comes with an inbuilt word art feature which can be found in the drawing tool on the platform.
In this article, we have explored multiple methods and techniques to create and insert word art into your documents in Google Docs. These methods include utilizing the built-in Google Docs Word art tool and creating Word art on external design platforms before importing it into Google Docs.
