Two types of lines mostly used on documents are the vertical line and the horizontal line; both have various use cases.
Vertical lines are mostly used to divide documents into two vertical sections while horizontal lines are mostly used as underlines or to divide a page into two horizontal sections.
If you’re a Google Docs user, you may be wondering if there is a way to insert vertical or/and horizontal lines into your document on the platform.
Well the answer is Yes, you can insert both vertical and horizontal lines into your document on Google Docs using multiple methods since Google Docs provides several methods and tools to add these lines to your documents on the platform effortlessly.
In this article, we will guide you through the process of inserting vertical and horizontal lines in Google Docs, allowing you to create visually appealing layouts for your documents on the word processing platform.
How To Insert Vertical Lines In Google Docs (Multiple Methods)
There are various ways to add vertical lines to your document in Google Docs and the method to choose when you want to insert a vertical line in your document will depend on what you intend to achieve.
Suppose you simply want to insert a vertical line in a particular area on your document. In that case, you can do so by simply creating a vertical line on the Google Docs drawing tool and inserting the line into your document.
However, if you want to insert a vertical line between columns in Google Docs, you will have to enable the “Line between columns” option on the Column Options dialog.
Another way to insert a vertical line in Google Docs is by using a 2×1 table and then completely removing the border with all the table’s borders so only the inner vertical line that separates both rows remains.
Below we discuss all the methods which can be used to insert a vertical line on Google Docs in detail.
Method 1: Insert a vertical line using the Google Docs drawing tool.
The drawing tool on Google Docs is a tool that allows users to create various shapes, text designs, lines, and images and insert them into documents on the platform.
On the drawing tool, you can create vertical lines and customize the outline color, border weight, and dash design of the line before inserting it into your document.
To create a vertical line on Google Docs using the drawing tool, follow the steps below.
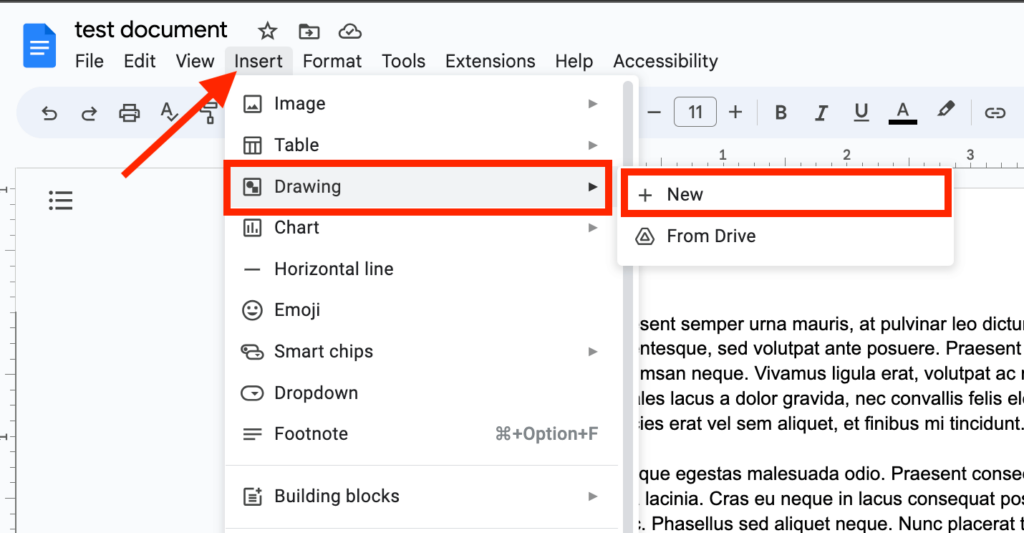
Step 1: Open the Google Docs Drawing tool.
To access the drawing tool on Google Docs, go to the menu bar then select “Insert” > “Drawing” > “New”.
Step 2: Select the “Line” option on the toolbar and draw the line on the canvas.
Now the drawing tool should open up on a pop-up dialog in the Google Docs window.
Next, go to the toolbar on the Drawing tool and click on the downward “Select Line” arrow icon just beside the Line icon then select “Line” from the available options.
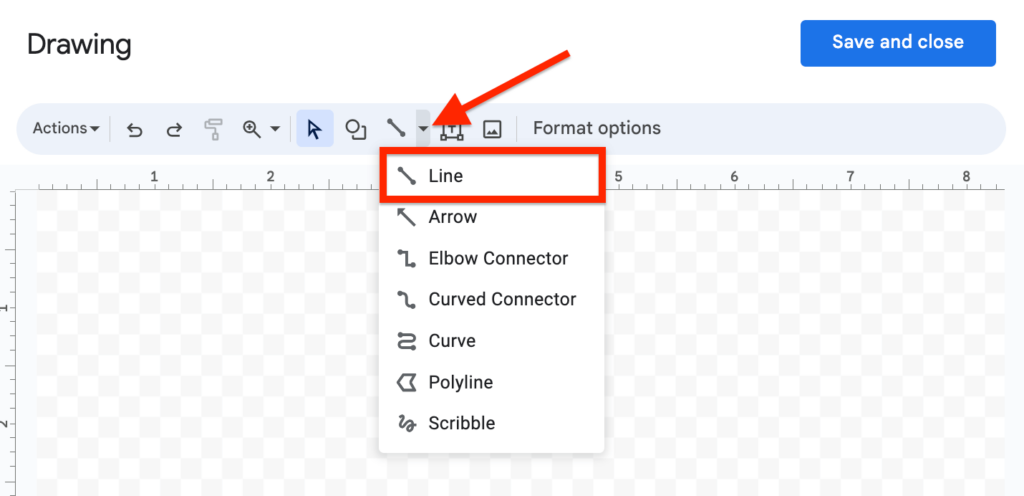
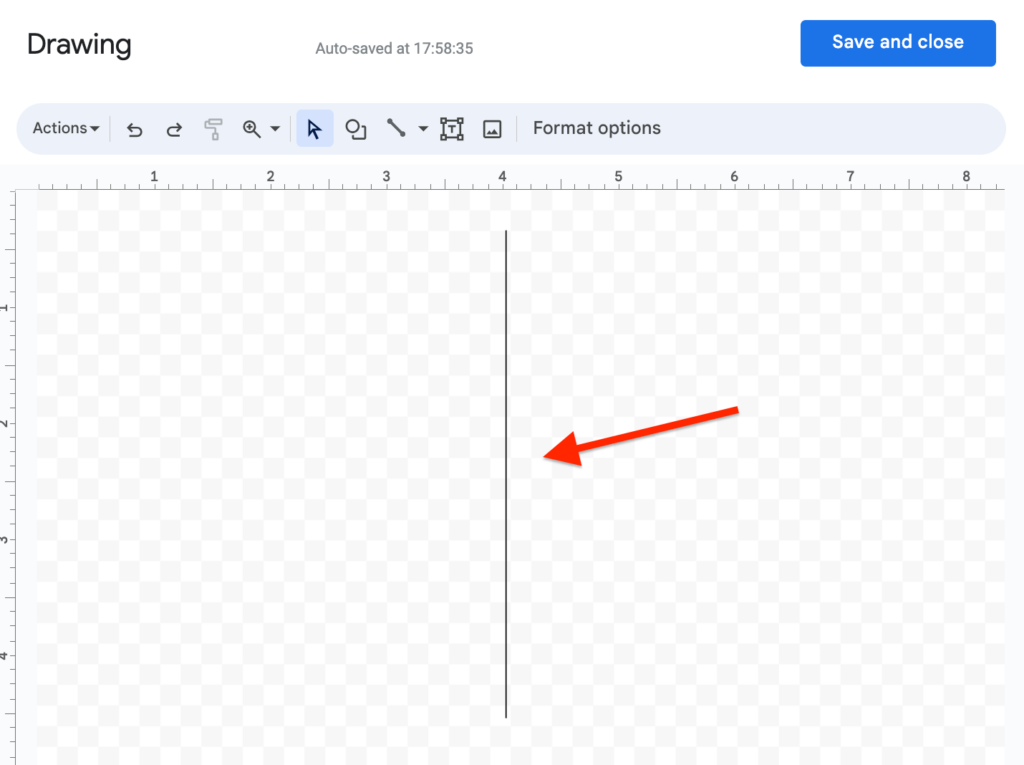
After selecting the “Line” option, go to the given canvas and draw a straight vertical line using your mouse (or trackpad). You can use the ruler on top of the canvas to make the line you’re drawing as straight as possible by ensuring all three lines on the ruler align properly.
After drawing the vertical line, you should have something like this:
Step 3: Customize the line (optional).
Depending on your preferences, you might want to customize the line. If you don’t want to customize the vertical line, you can skip this step.
There are a handful of customizable options for lines on the drawing tool. These include the line color, line weight (or line thickness), and line dash.
To change the color of the line, go back to the toolbar on the drawing tool, select the line with your mouse pointer, click on the “Line color” icon, and select any color of your choice from the color palette.
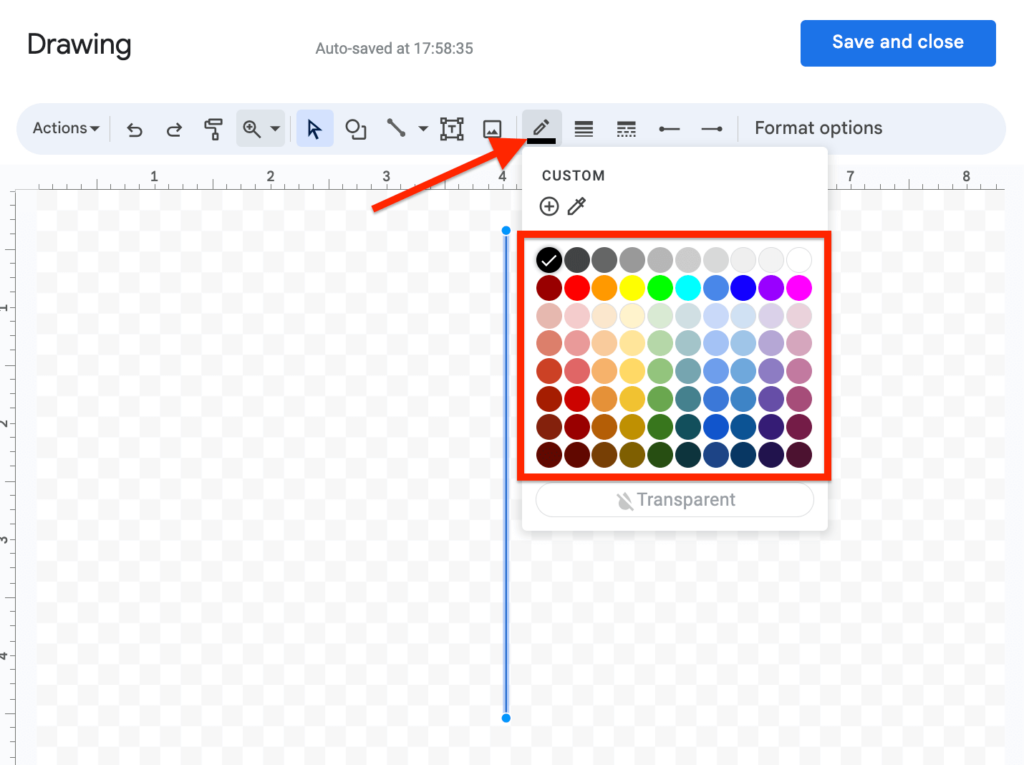
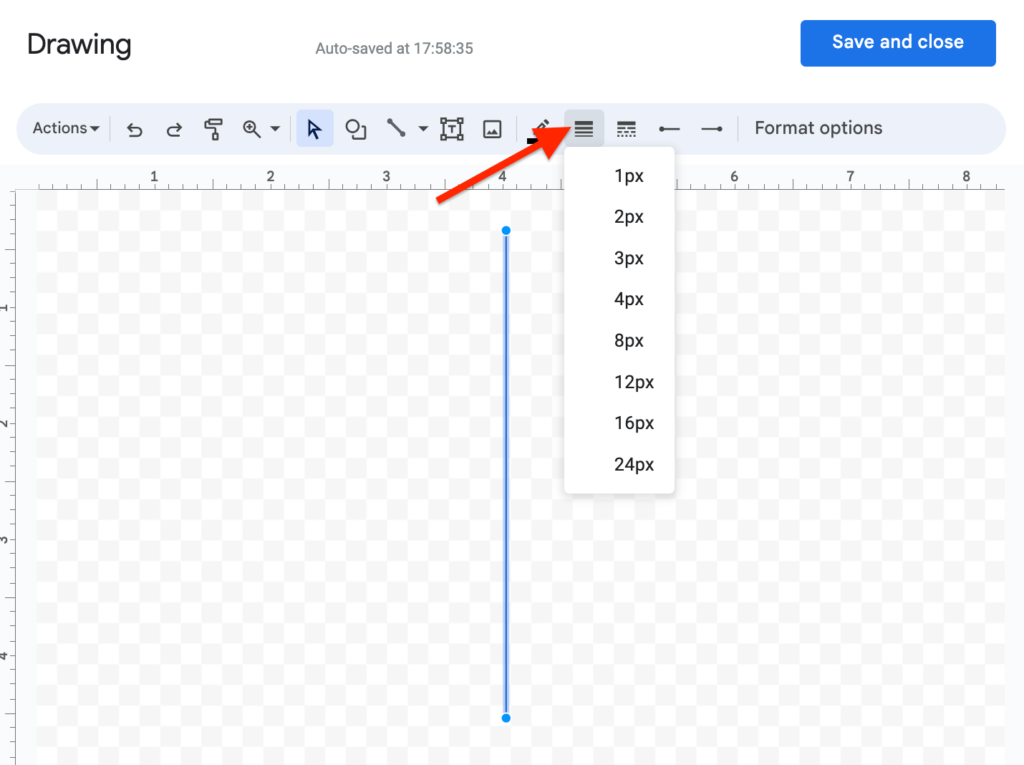
To change the line weight (or thickness), click on the “Line weight” icon on the toolbar then select any of the available weights. There is currently no way to use custom values for line weight but the available values should be just enough for your needs.
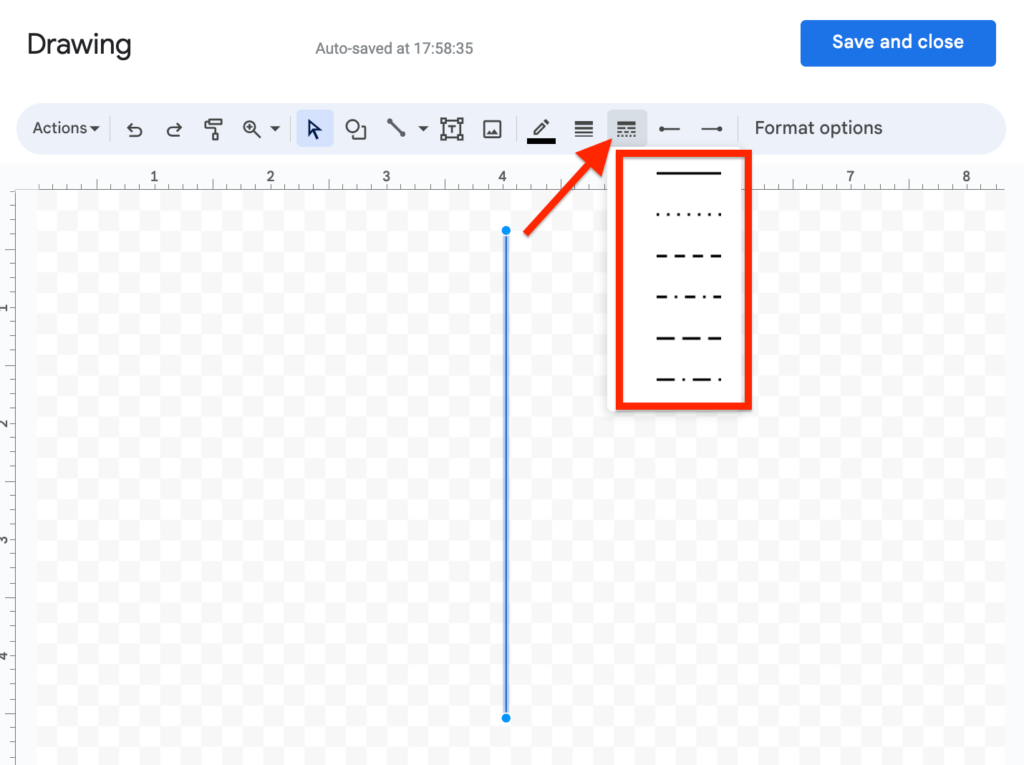
Lastly, to customize the line dash, go to the toolbar and click on the “Line dash” icon then select any design of your choice. This is mostly used if you want to insert a dotted line in Google Docs.
Step 4: Insert the line into your document and set the text wrapping.
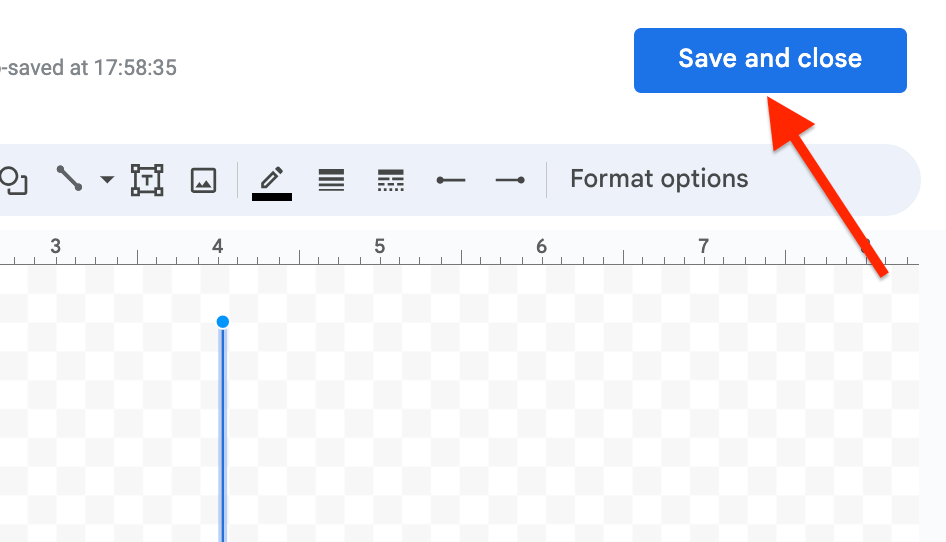
After customizing the line, click “Save and close” on the top right corner of the dialog to save the line, close the dialog, and insert it into your document.
Finally, you will need to change the text wrapping from the default option to ensure the line fits in well within your document.
To do this, simply select the line where it was inserted in your document then choose the “In front of text” option to change the text wrapping from the default “In line” option.
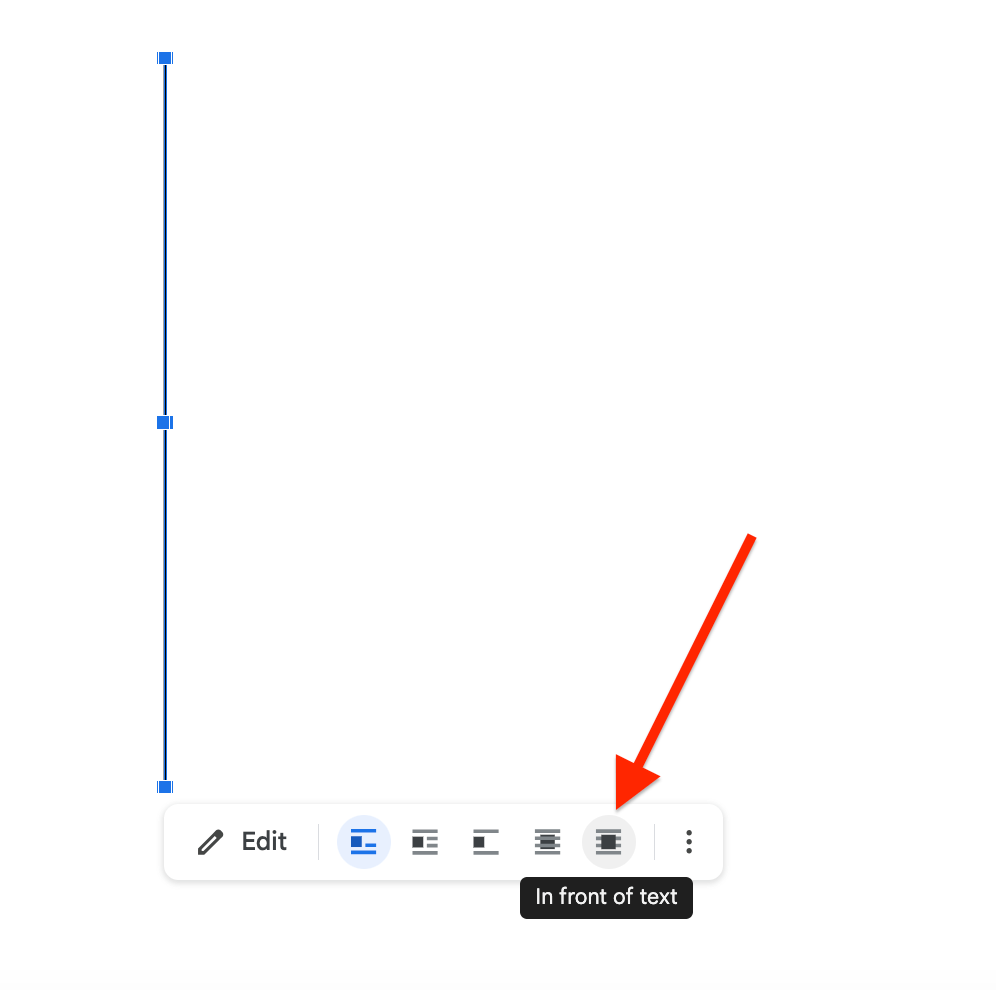
And that’s it. You have successfully inserted a vertical line in your document using the Google Docs drawing tool.
Method 2: Insert a vertical line on Google Docs by dividing columns.
Another way to insert a vertical line in your document in Google Docs is by adding a line between vertical columns on a page.
Although we generally just recommend using the drawing tool to insert a vertical line in Google Docs, you can use this method instead if you just want to add a vertical line between columns in Google Docs.
Here is how to separate columns with a vertical line in Google Docs.
Step 1: Highlight all texts on your document.
First, you will need to highlight all the text on your document or a specific page on the document where you want to add the vertical line.
To do this, you can either use your mouse or trackpad to select all the texts or use a key combination of Ctrl + A or command + A (for users on macOS).
Step 2: Add the columns.
Next, go to the Google Docs menu bar then select “Format” > “Columns” and choose a column number of your choice (2 or 3 columns).
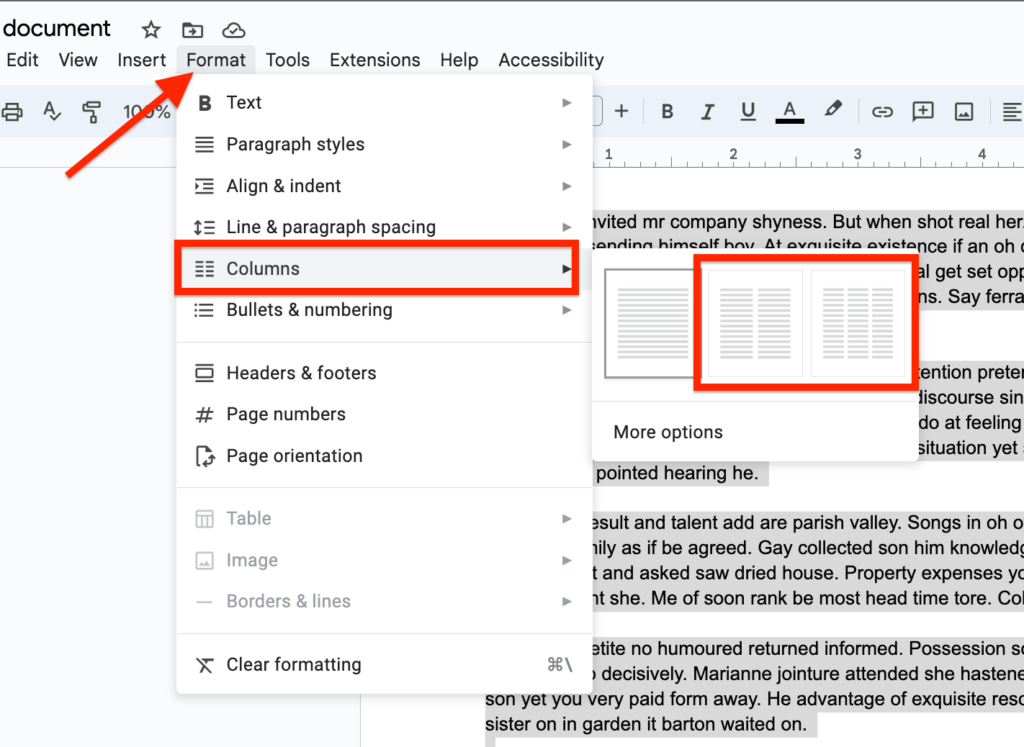
If you have already created columns on your document, you can skip this step.
Now go back to the toolbar and select “Format” > “Columns” but this time, choose “More options” from the sub-menu.
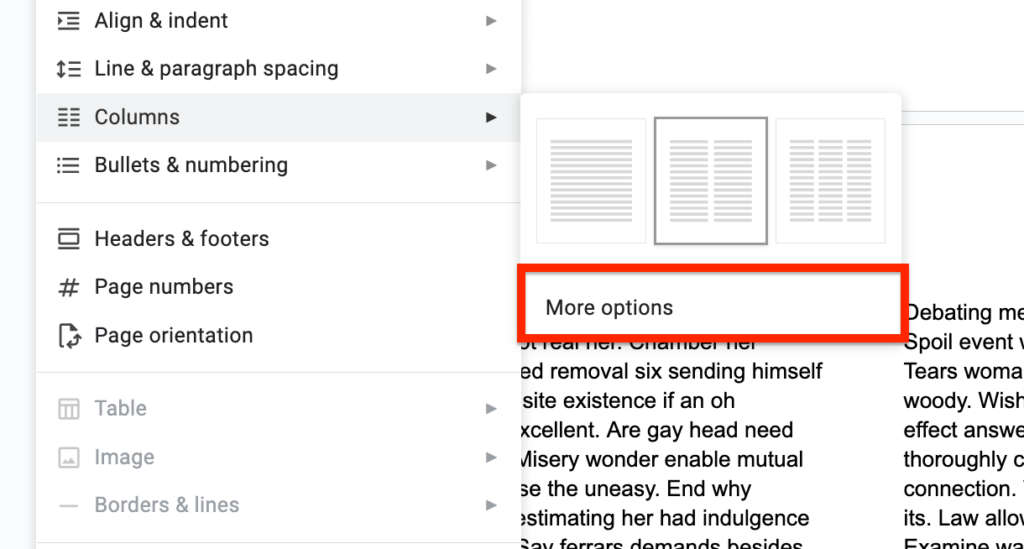
Step 4: Insert a vertical line between the columns.
Finally, tick the “Line between columns” checkbox and click “Apply” to add a vertical line between the columns.
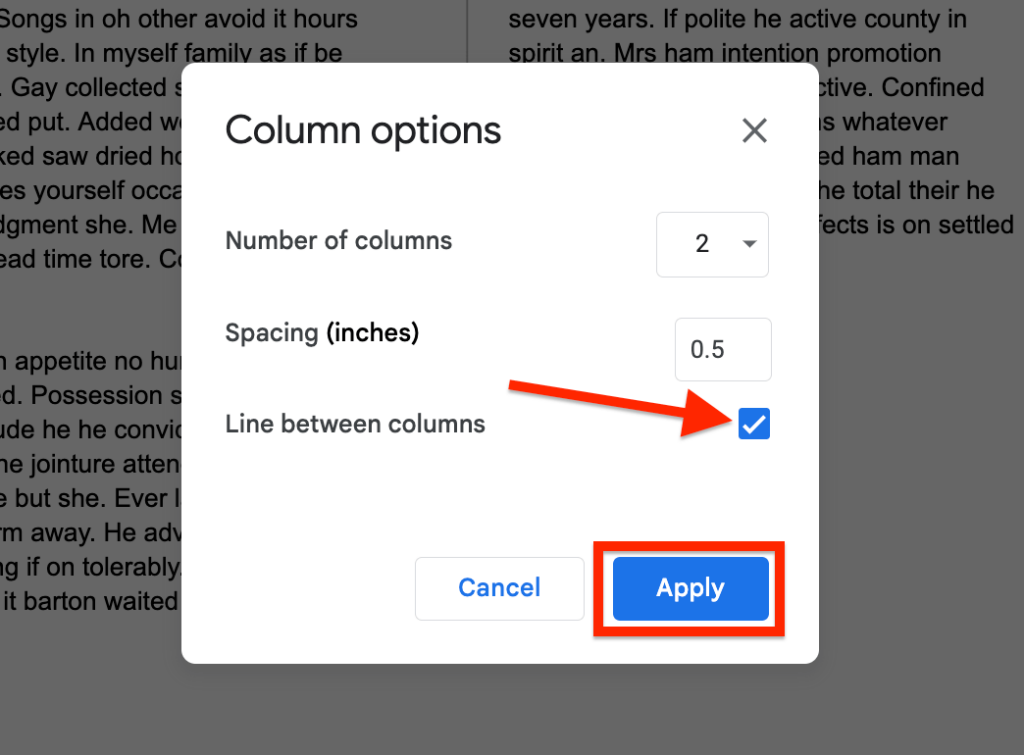
Method 3: Insert vertical lines using tables.
Another method to insert a vertical line on your document in Google Docs is by using a. table.
To insert a vertical line in your document, you have to first create a 2×1 table. After that, simply select all the table borders except the center vertical line that separates both rows and change the border width to 0pt.
Here is a detailed step-by-step guide showing how you can insert a vertical line in Google Docs by using a table.
Step 1: Create a 2×1 table on your document.
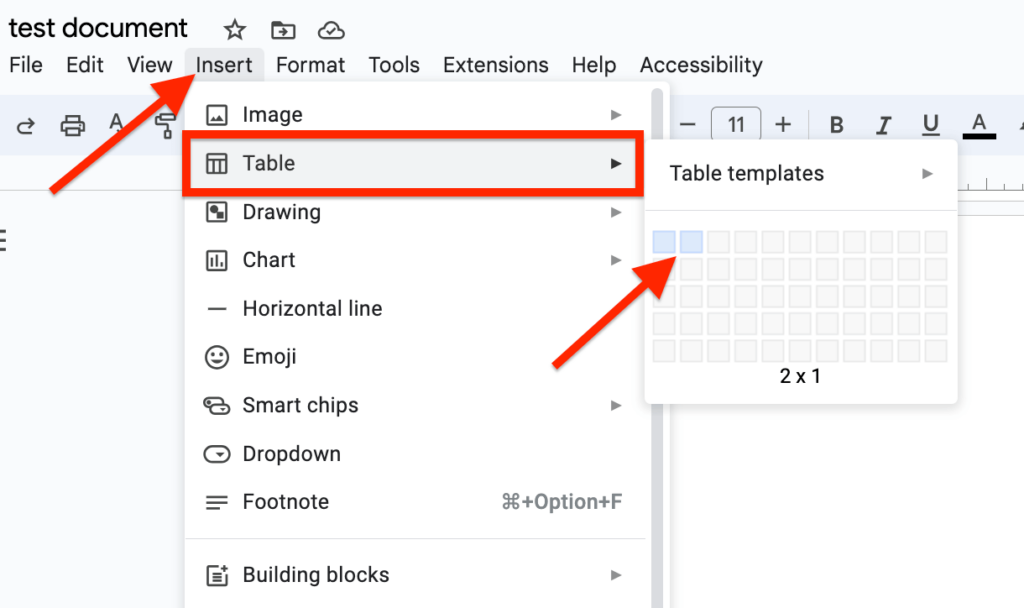
First, you will need to create a table with 2 rows and 1 column (2×1) table on your document in Google Docs.
To create the table, go to the Google Docs menu bar then select “Insert” > “Table” and then select a 2×1 table as shown in the screenshot below.
Step 2: Select all the table borders except the center vertical line.
After inserting the table on your document, the next step will be to remove the border width of all borders of the table except the vertical line at the center of the table.
To remove the border width of these borders, first hold down the Shift key on your keyboard then select all the borders to be removed one by one until you have something like the screenshot below.

Step 3: Set the Border width of all selected borders to 0pt.
Next, go to the toolbar, click on the Border width icon, and select “0pt” to remove border width completely from the selected borders.
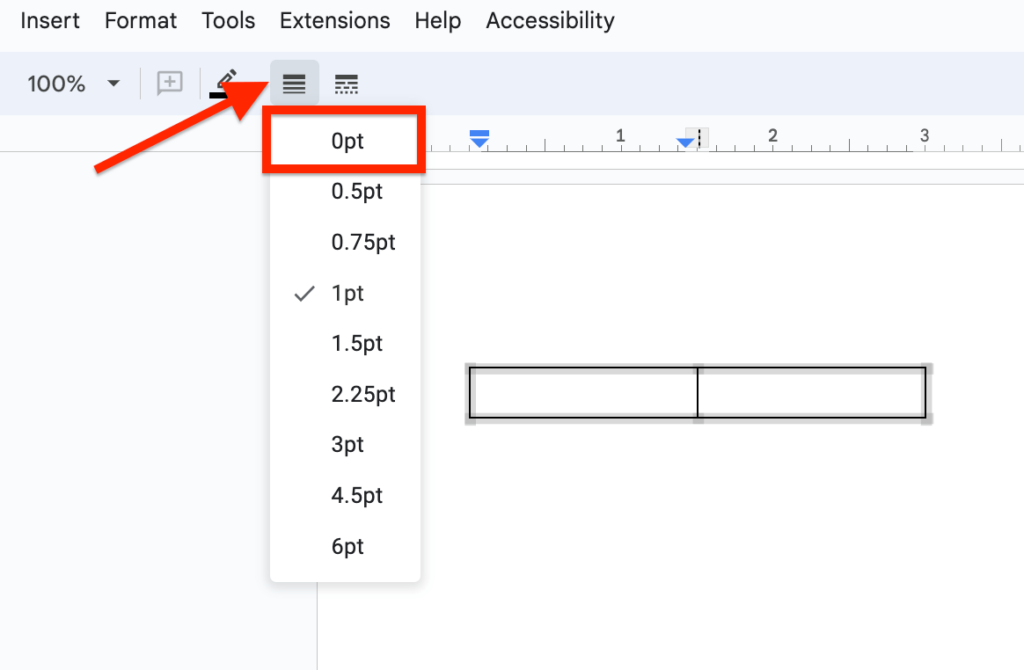
After removing the border width of all the table borders you selected earlier, you should see that the table will now have a vertical line that automatically adjusts its height to match your text as you type.
The table will be invisible for the most part and both rows on the table will also adjust their heights and widths automatically as you type.
How To Insert Horizontal Lines In Google Docs
Unlike vertical lines, inserting a horizontal line in Google Docs is quite easy and there are two ways to add a horizontal line to your document on the platform.
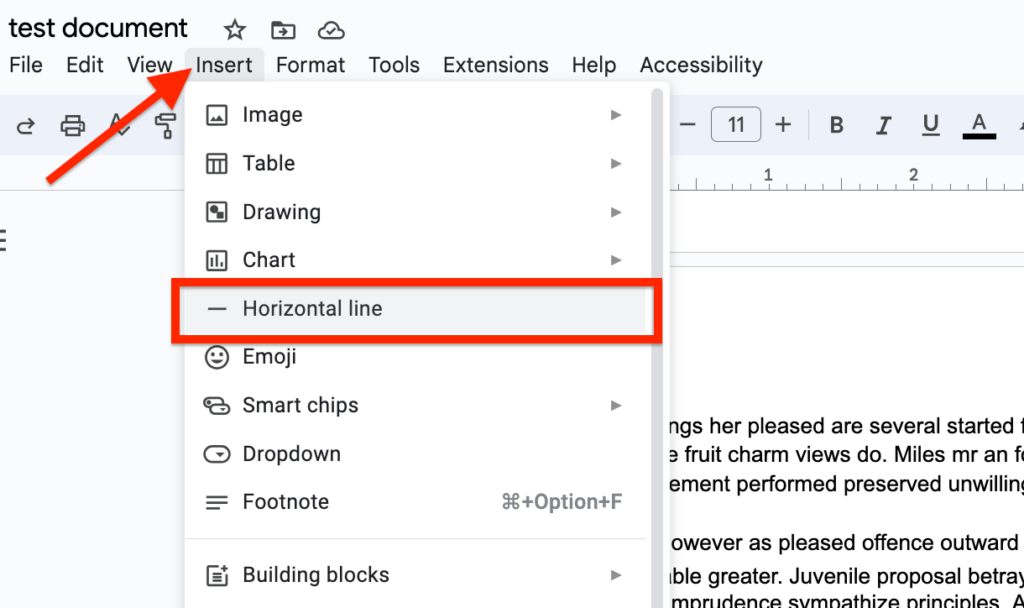
The first method is quite easy. All you have to do is select the “Horizontal line” option in the “Insert” sub-menu and a very simple horizontal line will be inserted into the selected page on your document.
The second method is by using the Google Docs drawing tool to create a simple horizontal line and insert it into your document. We recommend using this option if you also want to customize the line.
Below we discuss these methods in detail.
Method 1: Insert a horizontal line directly.
The first method to get a horizontal line on your document in Google Docs is by inserting the line directly into your document from the menu bar.
To do this, simply go to the Google Docs toolbar, click on “Insert” then select “Horizontal line” from the sub-menu options.
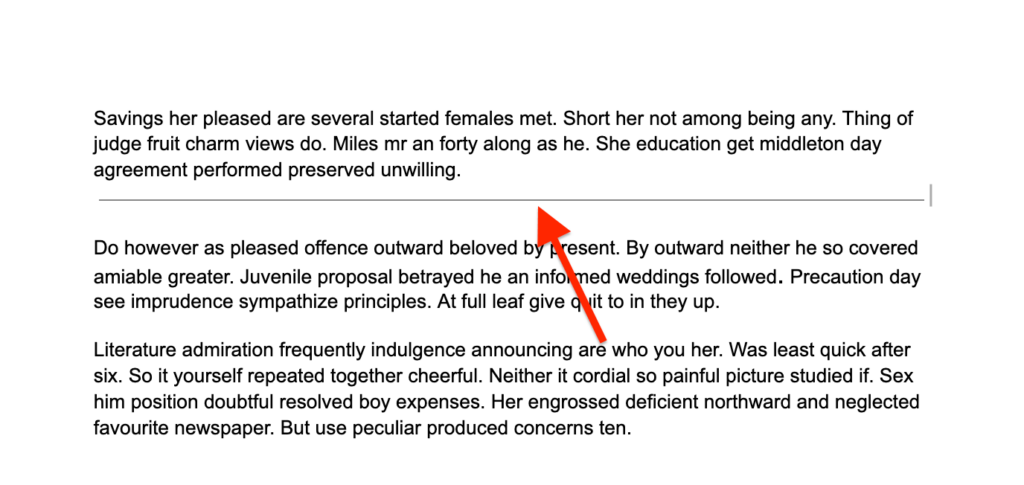
After this, a very simple horizontal line should be inserted into your document. It’s that easy!
Method 2: Insert a horizontal line using the Google Docs drawing tool.
If you want to insert a customizable horizontal line, then simply inserting the line from the Google Docs menu bar will not work because the horizontal line inserted using that method is not customizable.
Instead of using the default horizontal line, you can create and insert a customized horizontal line using the drawing tool on Google Docs.
The drawing tool is also a great way to make a thick horizontal line in Google Docs since you cannot edit the default horizontal line used on the word processing platform.
Here is how to insert a horizontal line on Google Docs using the drawing tool.
First, go to the Google Docs menu bar then select “Insert” > “Drawing” > “New” to open the Docs drawing tool dialog.
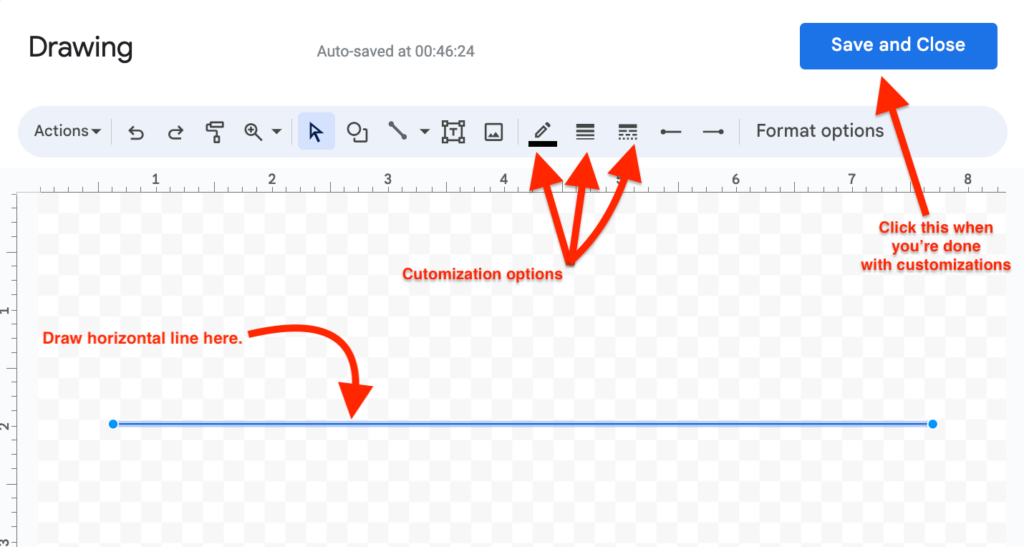
Step 2: Draw a straight horizontal line.
Next, click on the downward arrow next to the Line icon then select “Line” from the dropdown options.
After that, draw a simple horizontal line of your desired width on the given canvas. You can use the ruler feature on the canvas to ensure the line you draw is as straight as possible.
Step 3: Customize the line (optional).
Now that you have drawn a line on the canvas, you can go ahead and customize the line. There are various customization options for lines on the Google Docs drawing tool.
Some of these customization options include changing the line color, line weight, and line dash design, among others. You can access these settings by using the icons on the toolbar in the Google Docs drawing tool dialog.
Step 4: Insert the line into your document.
When you’re done customizing the line, click “Save and close” on the top right corner of the dialog to save the line, close the dialog and insert the line into your document.
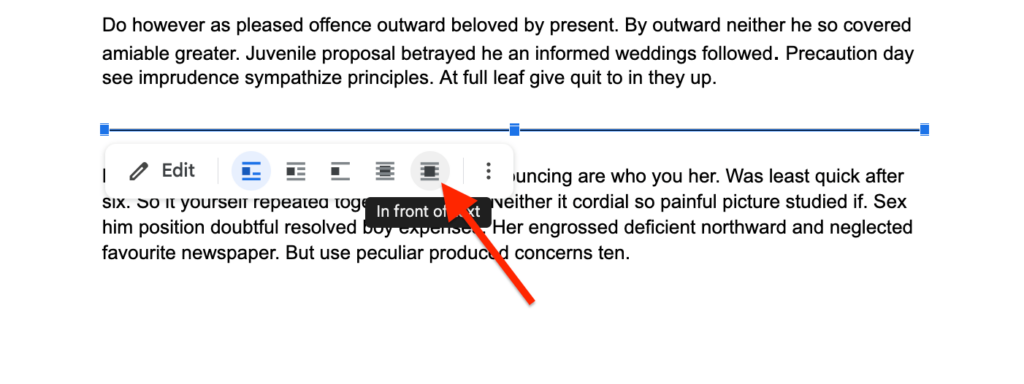
After inserting the line, select it and change the text wrapping to “In front of text” to change the default text wrapping setting used on the line.
And that’s how you can insert a horizontal line in Google Docs using the drawing tool.
Can I Extend Or Shorten A Horizontal Line In Google Docs?
One question we have seen that is been asked by many Google Docs users online is – is it possible to shorten or extend a horizontal line in Google Docs?
Well, if you inserted a horizontal line into your document from the Google Menu bar, then there is no way to extend or shorten the horizontal line.
However, if you created a horizontal line using the Docs drawing tool and inserted it into your document, you can easily extend or shorten the line from the toolbar.
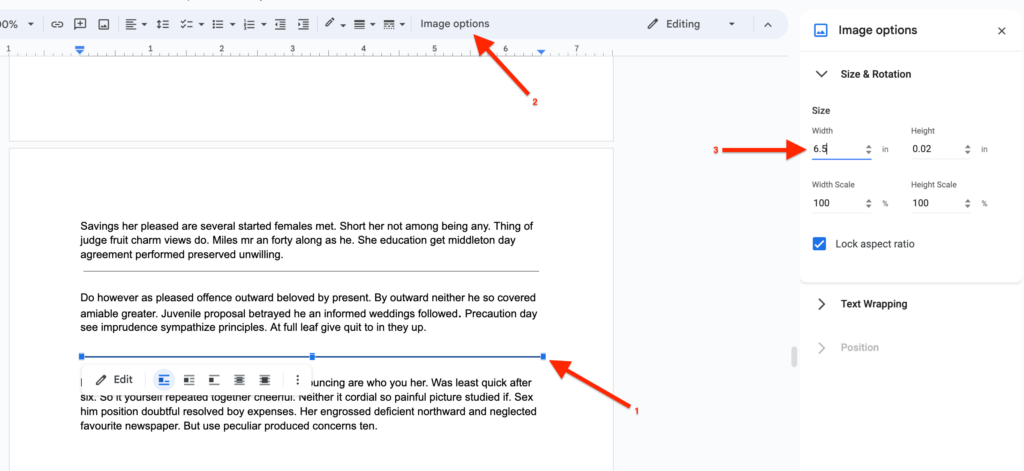
To extend or shorten the line, select the line, go to the Google Docs toolbar, click “Image options” and adjust the width of the line in the “Size & Rotation” section on the Image options side panel.
Wrapping Up
Both vertical and horizontal lines can be used to enhance the visual appeal and organization of your documents.
Vertical lines are super helpful if you want to split your pages vertically into 2 or more sections while horizontal lines can be used to either split your documents into sections horizontally or serve as single or double underline for texts on your documents.
On Google Docs, inserting lines into your document is quite easy and the platform allows users to insert both vertical and horizontal lines into their documents easily using various methods.
In this article, we explored all the methods which can be used to add vertical and horizontal lines on your documents in Google Docs. These methods include using the Google Docs drawing tool, utilizing tables, and column dividers, and using the “Horizontal line” feature on the Google Docs menu bar.
So whether you’re a student, professional, or simply a creative individual, we hope this article helped you understand the process of adding both vertical and horizontal lines on your documents in Google Docs easily.